


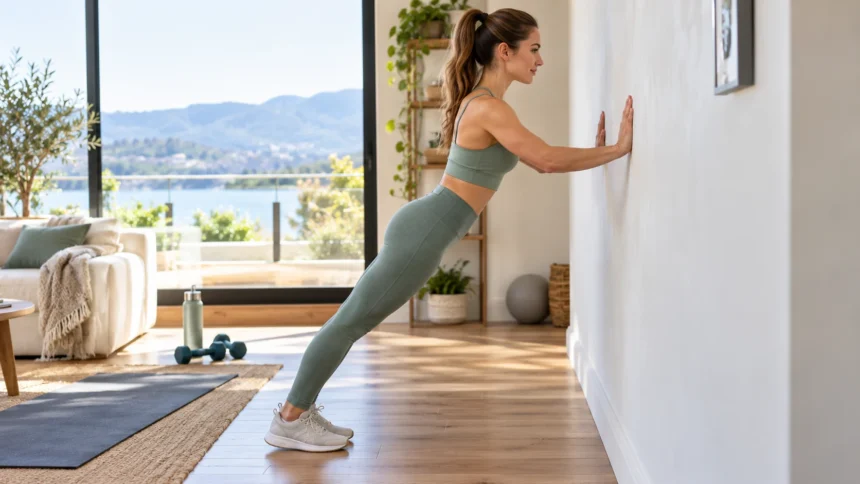
Wall push ups are one of the easiest ways to learn the basic pushing movement used in traditional push ups. Instead of supporting your body on the floor, you perform the exercise while standing and pressing against a wall. This reduces the amount of body weight you need to move while still training important upper-body and core muscles.
Because the exercise is relatively gentle, wall push ups can work well for beginners, older adults, people returning to exercise, or anyone building strength before attempting incline or floor push ups. They also require no gym equipment, making them convenient for home workouts, office movement breaks, or simple strength routines.
However, easy does not mean technique is unimportant. Hand position, body alignment, elbow angle, breathing, and distance from the wall all influence how the exercise feels. Learning proper wall push up form can help you build strength safely and create a solid foundation for more challenging push up variations.
What Is a Wall Push Up?
A wall push up is a standing bodyweight exercise performed with your hands against a wall. You begin with your arms extended, bend your elbows to bring your upper body closer to the wall, and then press yourself back to the starting position. The movement follows the same basic pushing pattern used in a regular push up.
The biggest difference is the amount of resistance. During a floor push up, you support a larger percentage of your body weight, while the wall version places much less load on the arms, chest, and shoulders. This makes it easier to practice technique without requiring high levels of upper-body strength.
Wall push ups can be used as a starting exercise or as part of a warm-up. They may also be useful when a person wants to train pressing muscles without getting down onto the floor. As strength improves, the exercise can gradually be made harder by changing body position or progressing to lower surfaces.
What Muscles Do Wall Push Ups Work?
The chest muscles, particularly the pectoralis major, provide much of the force during a wall push up. As you press your body away from the wall, the chest works together with the shoulders and arms. Although the resistance is lighter than a floor push up, the same basic muscle groups are involved.
Your triceps, located along the back of the upper arms, help straighten the elbows during the pressing phase. The front of the shoulders also contributes to controlling and producing movement. Keeping your elbows in a comfortable position allows these muscles to share the work rather than placing excessive pressure on one joint.
The core and lower body also help maintain alignment. Your abdominal muscles, glutes, and legs provide stability so your body moves as one controlled unit instead of bending at the hips. This is why good posture matters even though wall push ups are primarily considered an upper-body exercise.
How to Do a Wall Push Up Correctly
Stand facing a sturdy wall and place your hands against it at approximately chest or shoulder height. Position your hands slightly wider than shoulder-width apart, then step your feet backward until your body forms a gentle forward angle. Keep your feet comfortably separated so you feel balanced throughout the movement.
Tighten your core lightly and maintain a straight line from your head through your hips toward your heels. Bend your elbows slowly and allow your chest to move toward the wall. Keep your neck neutral and avoid leading forward with your chin while the rest of your body stays behind.
Once your chest approaches the wall, press through your palms and straighten your elbows without aggressively locking them. Return to the starting position under control, then repeat. A beginner might start with 8–12 repetitions and focus on smooth technique before increasing the number of sets or making the movement harder.
Proper Hand, Elbow, and Body Position
Your hands should feel secure against the wall and remain roughly level with the middle of your chest or shoulders. Placing them too high can change the movement and reduce comfortable pressing mechanics. Keeping the fingers spread naturally may help distribute pressure across the hands and improve stability.
Avoid letting your elbows flare directly outward at a 90-degree angle from your torso. Instead, allow them to travel slightly backward at a comfortable diagonal as you lower yourself. This position usually creates smoother movement through the shoulders while still allowing the chest and triceps to work effectively.
Your body should remain long and controlled rather than folding at the waist. Keep your ribs and pelvis reasonably aligned and avoid pushing your hips backward as your chest approaches the wall. Imagine moving your whole body toward and away from the wall instead of moving only your shoulders.
Benefits of Wall Push Ups
Wall push ups are useful for building basic upper-body strength with relatively low resistance. They train the chest, shoulders, and triceps while allowing beginners to practice a movement that can later progress toward harder push up variations. This makes them especially helpful when standard floor push ups currently feel too difficult.
They can also improve confidence with bodyweight exercise. Someone who cannot perform a traditional push up may still complete controlled wall push ups and gradually develop the strength required for more challenging versions. Progress becomes easier to measure by increasing repetitions or changing the angle of the exercise.
Another benefit is convenience. You need only a sturdy wall and enough room to stand comfortably, so the exercise can be performed in many settings. Wall push ups can fit into short home workouts, warm-ups, rehabilitation-style routines when appropriate, or movement breaks during a mostly sedentary day.
Common Wall Push Up Mistakes
One common mistake is standing too close to the wall. When your feet are only a few inches away, the movement becomes so easy that the chest and arms receive very little challenge. Stepping farther back gradually increases resistance while still allowing you to maintain control.
Another mistake is allowing the hips to sag or move independently from the torso. This usually happens when the core is not engaged or when someone focuses only on bending the elbows. Keep your abdominal muscles gently active and think about maintaining one straight body line throughout each repetition.
Moving too quickly can also reduce the effectiveness of the exercise. Dropping toward the wall and bouncing back uses momentum instead of controlled muscle effort. Slow down the lowering phase, pause briefly if needed, and press away smoothly so the working muscles remain engaged throughout the full movement.
Wall Push Ups and Back Posture
Good spinal alignment helps make wall push ups more comfortable and effective. Your lower back should remain in a natural position rather than becoming excessively arched as you approach the wall. Engaging your core lightly can help keep your ribs and pelvis organized during each repetition.
People who spend long hours sitting may notice that poor posture or limited movement affects how comfortable pushing exercises feel. If you regularly experience a stiff back, improving general mobility and paying attention to posture may make exercise feel easier. Wall push ups should not require you to force your spine into an uncomfortable position.
If back discomfort appears during the exercise, check whether your hips are sagging or your feet are positioned too far from the wall. Moving slightly closer can reduce resistance and make alignment easier to maintain. Persistent or sharp back pain deserves professional assessment rather than repeatedly pushing through discomfort.
How to Make Wall Push Ups Easier or Harder
To make wall push ups easier, move your feet closer to the wall. A more upright body position means you are pressing against less of your body weight. You can also reduce the number of repetitions and use a slower pace while you become comfortable with the basic movement.
To make the exercise harder, gradually step farther away while maintaining proper alignment. The greater forward lean increases the amount of resistance your chest, shoulders, and triceps must handle. Make only small adjustments so you can still control the lowering and pressing phases without losing form.
Once wall push ups become very easy, progress to an incline push up using a sturdy countertop, bench, or similar stable surface. As the support surface becomes lower, the exercise becomes more demanding. Eventually, you may progress toward knee push ups or full floor push ups depending on your goals and strength.
How Many Wall Push Ups Should You Do?
Beginners can start with one or two sets of approximately 8–12 repetitions. The exact number is less important than maintaining good form from the first repetition to the last. Stop the set if your shoulders become uncomfortable or your body position begins to break down.
As the movement becomes easier, you can gradually increase to two or three sets or add several repetitions. Another option is making the exercise slightly harder by stepping farther from the wall rather than performing very high numbers of easy repetitions. Progressive challenge encourages continued strength development.
You do not need to perform wall push ups every day to make progress. Two or three strength sessions per week may be enough for many beginners, especially when the exercise is combined with other movements. Allow your muscles time to recover and adjust your routine based on soreness and overall activity levels.
Wall Push Ups for Beginners and Older Adults
Wall push ups are often suitable for beginners because they require less strength and balance than many floor exercises. They also eliminate the need to lower yourself to the ground, which can be useful for people who find kneeling or floor transitions difficult.
Older adults may use wall push ups to maintain upper-body strength that supports everyday activities such as pushing doors, moving objects, and getting up from certain positions. However, exercise difficulty should still match individual fitness, balance, joint health, and medical circumstances rather than being chosen based solely on age.
A stable wall and secure footwear are important for safety. Avoid slippery floors or unstable surfaces, and do not perform the exercise against furniture that could move. Anyone with significant shoulder, wrist, heart, or balance concerns should discuss appropriate exercise options with a qualified healthcare or fitness professional.
When Should You Avoid or Modify Wall Push Ups?
Wall push ups should create manageable muscular effort rather than sharp pain. If you experience sudden discomfort in your shoulders, wrists, elbows, chest, or back, stop and reassess your position. Moving closer to the wall or adjusting hand placement may make the exercise more comfortable.
People recovering from upper-body surgery, fractures, serious shoulder injuries, or other medical problems may need to avoid pushing exercises temporarily. The safest progression depends on the specific condition and stage of recovery. Professional guidance is particularly important when activity restrictions have already been provided.
Wrist discomfort may sometimes improve by changing hand position or using a modified setup recommended by a professional. Do not repeatedly exercise through increasing pain in the hope that the joint will adapt. Strength training should challenge muscles without producing persistent or worsening joint symptoms.
How to Add Wall Push Ups to a Workout
Wall push ups can be included in a beginner full-body routine alongside exercises for the legs, back, hips, and core. For example, you could combine them with chair squats, standing calf raises, gentle rows using appropriate resistance, and simple balance exercises. This creates a more complete routine than training only pushing muscles.
They can also work well as a warm-up before more demanding upper-body exercises. Performing a small number of slow repetitions can increase movement through the shoulders and elbows while activating the chest and triceps. Keep warm-up sets easy so they prepare your muscles without creating unnecessary fatigue.
If your main goal is progressing toward regular push ups, use wall push ups as the first step in a gradual progression. Once you can perform several controlled sets comfortably, move to a lower stable surface. Continue lowering the incline over time until your strength and technique support floor-based variations.
Conclusion
Wall push ups are a simple and accessible exercise for building chest, shoulder, triceps, and core strength. They provide a lighter alternative to traditional push ups and can help beginners learn proper pushing mechanics without having to support as much body weight.
Good technique involves stable hand placement, controlled elbow movement, a neutral neck, and a straight body position. Avoid rushing repetitions, letting your hips sag, or standing so close to the wall that the movement provides almost no resistance. Small technique improvements can make the exercise much more effective.
As your strength improves, gradually move your feet farther from the wall or progress to lower incline surfaces. The goal is not to rush toward floor push ups but to build strength while maintaining control. With consistent practice, wall push ups can provide a practical foundation for more advanced upper-body exercises.
FAQs
Are wall push ups good for beginners?
Yes. Wall push ups reduce the amount of body weight you must press, making them a practical starting point for learning push up form and gradually developing upper-body strength.
What muscles do wall push ups work?
Wall push ups primarily target the chest, triceps, and front shoulders. Your abdominal muscles, glutes, and legs also help stabilize your body and maintain proper alignment during each repetition.
How many wall push ups should I do a day?
Beginners can start with one or two sets of 8–12 controlled repetitions. Daily training is not necessary, and recovery time can help your muscles adapt to strength exercise.
Can wall push ups help me do regular push ups?
Yes. They can build foundational pressing strength and teach proper movement patterns. Progress gradually from wall push ups to lower incline push ups before attempting full floor push ups.
Are wall push ups easier on the wrists?
They usually place less body weight through the wrists than floor push ups. However, wrist pain can still occur, so adjust your setup or seek professional advice if discomfort persists.